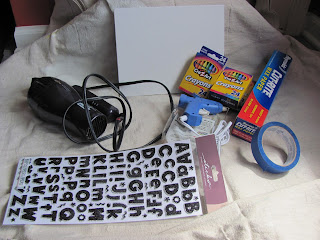
In an effort to help my husband set up his
classroom, I wanted to give it a more home like or crafty feel. So when we went school supply shopping, I
grabbed up a couple extra boxes of crayons.
Yes…I bought the cheap ones. I have
never noticed a difference and I had faith that my luck wasn’t all that bad and
it would work. I did some searching on
the internet about the best way to do melted crayon art and was starting to get
discouraged with the things I had read.
EVERYWHERE I read said NOT to use generic crayons. That it wouldn’t work. You have to use Crayola. Well…everything I read was WRONG! I do have to say you have to have patience
and common sense to do it right. You can’t
just take the hair dryer (or whatever you are using as a heat source) and start
waving it in front of the canvas. It
will splatter if you aren’t careful. This is the process I used and what I got out
of it.
What
I Used:
Hair Dryer
Crayons – enough of the colors you want to line the top of the
canvas
Canvas – I used 8x10 portrait
Hot Glue Gun
Extra Glue Sticks for gun – I went thru 2
Ribbon
OPTIONAL:
Wax Paper
Stickers
Painters Tape
What I Did:
I laid out a painting sheet in my kitchen. It might also be helpful to put wax paper
under the canvas but over the sheet unless you want melted crayon on the sheet.
Next I glued the crayons to the canvas. I went for the rainbow look….
Since I was doing this for my husband’s classroom, I wanted his
name on it. I opted for shiny
stickers. I placed them at the bottom
and covered with wax paper. I used the
painters tape to hold the paper in place and cut the tape so it has a jagged
edge where the crayon would be (I didn’t want just a straight stop line between
crayon and stickers).
After all the crayons are glued on (and stickers if using),
start melting! I tried 2 methods:
1) Put water jugs behind the sheet
to prop up the canvas. Heat from the
top. This allowed for a continuous
flow. End result: color was a lot lighter at the top and tended
to splatter more. Looked more like water
color.
2) Lay flat just slight elevated.
Heat from the bottom. The melted crayon
pooled just under the tip of the crayon.
Then lifted the canvas and let the melted crayon run down. End result:
color was darker and thicker.
Added a more dripped look.
It
took maybe 10-15 minutes to get a steady technique going and get to a place
with the color that I was happy.
I
pulled the tape to remove the wax paper while the crayon was still slight wet
since I was afraid the crayon would flake off if I tried after it dried. This is where I hit my first issue. The tape didn’t completely work on one
side. The crayon has gone under the tape
and around the stickers. Since this wasn’t
the consistent look I was going for, I opted to re-melt the crayon but this
time going over the stickers with the melted crayon.
When
the crayon has hardened again, flip over and glue ribbon to the back creating
your ability to hang your project. This
is where I hit my second issue.. There was
some melted crayon on the back and sides of the canvas. Since this was going to go on the wall, there
needs to be something on the back to keep the crayon from rubbing off. Hot glued paper or fabric should work. Then he decided he wants to hang it from the
window so it can be seen from outside the room.
Again, the back needs to be covered so it looks presentable.
In
the end, it’s not 100% what I was going for with his name, but he’s happy and I’m
happy!


No comments:
Post a Comment